Accommodating Resistance Training – Bands and Chains

Have you tried a Bench Press and you got stuck with the weight on the chest? While you are sure you can easily lock the same weight out?
Why is it, that the same weight feels so difficult in the bottom part of the movement, while it’s comparably easy in the top part of the movement?
Is there any way how you can train that?
Let’s talk about accommodating resistance and accommodating resistance training.
This article covers
- Understanding ascending and descending strength curves
- Why is deceleration not a good thing?
- Accommodating Resistance
- Accommodating Resistance vs Variable Resistance
- Accommodating Resistance Training
- What is the difference between Chains and Resistance Bands?
- Benefits of Accommodating Resistance Training
- How to use Accommodating Resistance Training
- How to use Resistance Bands
- How to use Chains
Understanding ascending and descending strength curves
The scenario I just outlined is a good example of understanding strength curves.
Without going into too much detail on joint angles and length-tension relationships, it’s important to understand, that the resistance changes throughout a movement.
What is an ascending strength curve?
During an ascending strength curve, the movement gets easier towards the end of the motion.
What are examples of an ascending strength curve?
Examples of strength training exercises with an ascending strength curve are pressing movements, such as horizontal presses (all bench press variations, push-ups, etc) and vertical presses (shoulder press variations, handstand push-ups, etc) and squatting movements (bi-lateral and unilateral squat variations, such as Back Squat, Front Squat, Overhead Squat, Single Leg Squats, Bulgarian Split Squats, also Leg Presses fall into this category)
What is a descending strength curve?
During a descending strength curve, the movement feels heavier towards the end of the movement.
What are examples of a descending strength curve?
Examples of strength training exercises with a descending strength curve are horizontal pulling movements (all rowing variations) and vertical pulling movements (Pull-Up variations and pull-down variations), we could also add Leg Curls to that category.
There are also strength training exercises with a parabolic strength curve, where the movement is heaviest in the middle part, such as arm curls.
How does understanding strength curves help?
Well, first and foremost now, you don’t need to wonder anymore why a Bench Press feels more difficult in the bottom part than in the top part.
But there are also more serious implications for training and the sporting reality.
If you look at strength training exercises with an ascending strength curve, studies have shown that depending on the training intensity (% 1RM) or loading, a portion of the movement goes into decelerating the bar. The lower the intensity, the more the bar is decelerated, only above 85% 1RM deceleration approximates zero.
Why is deceleration not a good thing?
Deceleration is not a good thing if you are thinking about strength development and power development.
Why is deceleration not a good thing for strength development?
If you look at the definition of strength, strength can be defined as the ability to exert force to overcome resistance. If you want to go a level deeper and look at the definition of force or the physical formula of force, you will see F = m * a – Force is the product of mass and acceleration.
In order to produce force, not only do you need to overcome resistance, you also need to apply acceleration.
For more information have a look at the article Chain-Resistance Training and Elastic-Resistance Training from Science for Sport
Why is deceleration not a good thing for power development?
Remember, Power can be defined as the ability to exert force in the shortest period of time
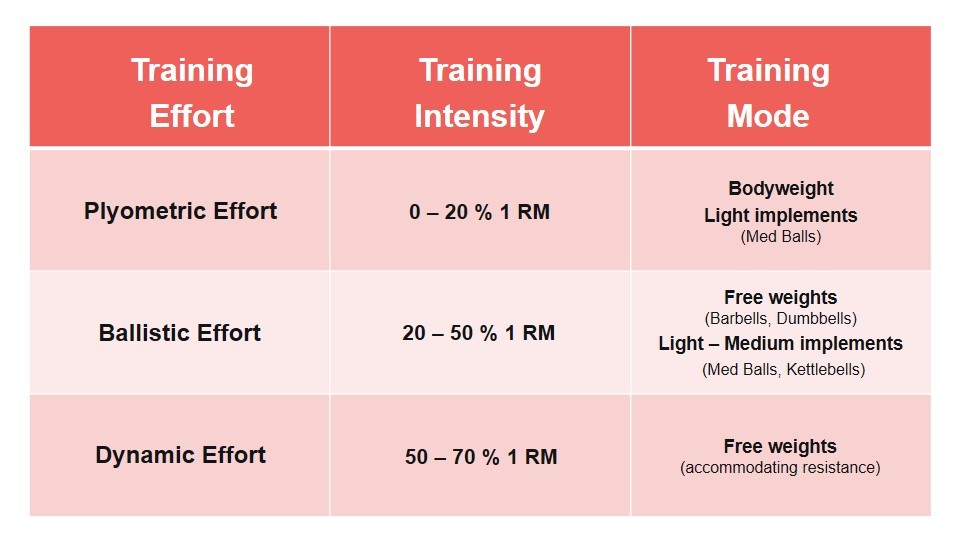
To train Power effectively, you need to train at intensities between 0 – 70% 1RM, have a look at the article 3 Steps to Develop your own Power Training Method and the image outlining the different Power Training methods borrowed from the article How to do Power Training
As I have outlined above, that a big portion of the movement goes into deceleration at intensities below 85% 1Rm, we have a problem…
So, what is the solution?
Accommodating Resistance
This section is going to be a bit theory-heavy, but I do my best to keep it simple.
Accommodating resistance is characterized by the resistance accommodating throughout the range of motion of a movement and more precise the resistance increases throughout the range of motion of a movement.
Consequently, accommodating resistance is used for ascending strength curves.
Accommodating resistance is used for ascending strength curves.
This is the fine difference between accommodating resistance vs variable resistance.
Accommodating resistance vs variable resistance – What is the difference between Accommodating Resistance vs Variable Resistance
Accommodating resistance and variable resistance are often used interchangeably, but strictly speaking, they are not the same thing.
The Free Dictionary defines
- Variable resistance as ‘a resistance that changes over the ROM when an isotonic contraction is used to move a load.’
- Accommodating resistance as ‘the increasing of resistance while lifting weights through a range of motion.’
To put it in simpler words,
- Variable resistance adjusts the changes the resistance over the range of motion (practical examples a bit further down)
- Accommodating resistance increases the resistance over the range of motion.
Therefore, technically speaking, accommodating resistance is a sub-category of variable resistance.
What does that mean in simple words?
If you go back to the three distinct strength curves, ascending strength curve, descending strength curve, and parabolic strength curve, you need to find the right resistance to match the strength curve.
You need to find the right resistance to match the distinct strength curves.
Ascending strength curve: lower resistance in the beginning and increasing resistance, so that resistance is highest in the end.
Descending strength curve: higher resistance in the beginning and decreasing resistance, so that resistance is lowest in the end. For those who have tried to bring the chest in contact with the bar in a pull-up know what I mean, it’s comparably easy to bring the chin over the bar, but then meet the bar with the upper chest or sternum is a different question.
Parabolic strength curve: higher resistance, in the beginning, lower resistance in the middle part, and higher resistance in the end. That’s why people swing the bar in an arm curl/biceps curl to get it past the most difficult point in the middle when the forearms are parallel with the ground. Or using Arnold’s euphemism of using ‘body groove’ to get past the sticking point.
Let’s not get stuck in worrying about terminologies and keep it practical.
Accommodating Resistance Training
Accommodating resistance training basically is a form of strength training where the resistance increases throughout the range of motion.
If you go back to the example from the beginning, the Bench Press that feels heavier in the bottom position and lighter towards the end of the movement, accommodating resistance for the Bench Press means that as you push the bar up, the resistance increases.
How is that achieved?
The most common ways to achieve that are through the use of chains and resistance bands.
Have a look at the video, that explains how accommodating resistance works on the example of a Back Squat.
Let’s have a quick look how chains and resistance bands work.
Depending on the size of the chain, the chain has a certain weight, as in the example of the video each chain weighs 15 kg, which is a total of 30 kg for two chains.
Let’s assume the chain has 10 segments, which means each segment weighs 1.5 kg.
As you descend, one segment at a time will touch the ground and reduce the total weight of the chain by 1.5 kg or reduce the total load by 3 kg since you need to count both chains. By the time you are in the bottom position, maybe 6 segments of the chain are on the ground and the total load is reduced by 18 kg (9 kg per chain).
The same principle applies for resistance bands, in the top position the bands are maximally stretched and when you descend, the band tension decreases. And so does the total load decrease as well.
So, what’s the bottom-line?
The chains or bands provide more resistance in the top position when you are strongest and less resistance in the bottom position when you are weakest.
The chains or bands provide more resistance in the top position when you are strongest and less resistance in the bottom position when you are weakest.
Ok, this is clear, now the next logical question is…
What is the difference between chains and resistance bands?
Well, resistance bands are made of rubber, and chains are made out of steel.
The main difference between chains and resistance bands is the way they provide resistance.
The resistance provided by chains is linear, as explained in the example above, each segment has a certain weight and the additional resistance or tension increases linearly by each segment added to the chain.
Bands provide the resistance exponentially, which means in simple words, a centimeter of stretch in the bottom position has a different tension that a centimeter of stretch in the top position.
The resistance provided by chains is linear, whilst bands provide the resistance exponentially.
Another difference that isn’t addressed very often is that bands are more versatile and can offer resistance in various directions. While the chain resistance is limited to gravity and can only help with strength exercises where you work against gravity (in simple words vertically down and vertically up), bands can provide resistance in various directions (horizontal, diagonal, etc). In addition to that, bands can be used in reverse as well, I will explain that a bit later when talking about ‘reverse bands’.
Important to note, just because bands are more versatile it doesn’t mean they are superior to chains. Both bands and chains have their unique advantages.
What are the implications of the difference between chain and bands?
As a recap, the main difference between chains and bands is the different resistance they provide, while chains provide a linear increase in resistance, bands provide an exponential increase in resistance.
With the exponential increase in resistance, bands require much higher eccentric strength and eccentric control. If you have ever done a fairly heavy band resisted strength training exercise, such as the Squat, for example, you will feel the bands literally pulling you into the ground.
Consequently, bands have a much greater effect on the stretch-shortening cycle activity and storage of elastic energy and are the first choice for Power Development.
Bands have a much greater effect on the stretch-shortening cycle activity and storage of elastic energy.
If you want to read up on the stretch-shortening cycle and use of elastic energy, have a look at the articles
- What are the Benefits of Plyometric Training?
- Why understanding the Mechanics Behind Plyometric Training will make you jump like Michael Jordan
In addition to the enhanced stretch-shortening cycle activity and use of elastic energy, bands are also much easier to control and allow to work explosively, which can be an interesting tool not only for dynamic efforts but also for ballistic efforts and for plyometric efforts.
Looks like all the credit goes to bands?
Not really, chains have their unique benefits as well.
Whilst bands can be used for strength development as well, I have found from my experience that chains are a great tool for strength development.
I have probably outlined my philosophy before that there very rarely there is a one-size-fits-all solution and much rather a specific solution to a specific problem.
There is very rarely a one-size-fits-all solution, but much rather a specific solution to a specific problem.
The same applies to the chains vs bands discussion, none is better than the other, you need to know when to use chains and when to use bands.
Benefits of Accommodating Resistance Training
From a very practical standpoint, accommodating resistance training is a tool in your toolbox to improve strength and power development by allowing you to accelerate the resistance throughout the whole range of motion.
There are numerous examples and texts on the benefits of accommodating resistance for the strength athlete. In a nutshell, these benefits boil down to
- Increased strength and power through greater neural activation: higher recruitment of muscle fibers, increased firing frequency, and better synchronization (reduced reciprocal inhibition). More information on neural activation in the articles
- Overcoming the sticking point, bands, and chains are one of the best tools in your toolbox to address and overcome sticking points. I have written about some practical examples of sticking points and how to overcome them in the articles
An aspect that is not that often mentioned in the context of using accommodating resistance and accommodating resistance training in order to enhance sports performance, is the aspect of acceleration and training acceleration.
Let me explain.
Most sporting actions require you to accelerate throughout the entire range of motion or to be precise, you need to accelerate as long as the force is applied.
Some applied examples:
- while jumping you need to accelerate until you leave the ground
- while throwing or hitting you need to accelerate until you release the object you are throwing
- while hitting or kicking you need to accelerate until the moment of contact or through the moment of contact
The implementation and use of accommodating resistance training can help to improve this quality of acceleration in a jump, throw, hit, or kick.
How to use Accommodating Resistance Training
This is where the information becomes either a bit shallow or is not always very practical.
As Dave Tate mentioned in one of the first articles on Accommodating Resistance – How to use bands and chains to increase your max lifts ‘It’s taken us five years to figure out why we think chains and bands work.’
For a practitioner, very often you are faced with the situation that what you have read and what you have been taught doesn’t always work that well in practice and you need to find a way to figure it out, how it works.
Very often as a practitioner you are faced with the situation that what you have read and what you have been taught doesn’t always work that well in practice and you need to find a way to figure out how it works.
What I am going to present here are the ways, that I have figured out accommodating resistance training can be used for athletes and also provide my rationale for using it and when to use it.
We have different possibilities to attach the bands and chains and each possibility has its own advantages and applications.
Let’s have a look at different opportunities.
How to Use Resistance Bands
You can attach the bands in two ways
- having constant tension on the resistance bands, with the lowest tension in the bottom position
- having the resistance bands lose in the bottom position, therefore no tension in the bottom position and the tension increases once weight moves up
Let’s look at the two examples
Constant tension on the bands
As you can see the resistance band provides constant tension from the start position of the Back Squat to the bottom position of the Back Squat (well, there is a slight slack, I should have attached the bands better, but you get the idea).
I use this variation when working on Power Development, especially when using the dynamic effort.
The rationale is if you want to use it for power development and you are using 50 – 70% of your 1RM and you maximally accelerate the bar in the concentric movement of the Squat, the bar will fly off your shoulders or you need to decelerate early enough that the bar stays on your shoulders.
Both options are not ideal.
Option 1 is self-explanatory, imagine being Twan van Gendt as in this video (and having to catch 120kgs)
Option 2 is what I was referring to in the beginning when you work on power development you want as much acceleration to go into the bar as possible and avoid deceleration.
You can also use the constant band tension to work on maximum strength development, remember Force is the product of mass and acceleration.
The difference between using bands for Power Development and using bands for Maximum Strength Development is the portion of resistance provided by bands vs free weight.
The difference between using bands for Power Development and using bands for Maximum Strength Development is the resistance provided by bands vs free weight.
This means for maximum strength development the band resistance is a bit lower (smaller bands), otherwise, you will get problems locking the weight out or you will use the next option with loose bands in the bottom position. For Power Development you are using bigger bands, that provides more resistance.
Loose bands in bottom position
Here you can see the tension on the bands in the start position, tension being loose in the bottom position and the tension picking up at around 110 – 120-degree knee angle.
I have to admit, this variation of accommodating resistance training gets a lot of criticism and is believed as a bit of nonsense. However, I use it, and want to share my thought processes with you.
You can use this variation when you want to work on a specific sticking point. Keep in mind that setting up the bands will take time to adjust the bands in that way that tension picks up, where you want it to pick up.
If you strongly believe in angular specificity, which means you want to do most of your training in the angles that happen in your sport, this could also be an alternative.
What I am referring to, in some sports there seems to be a strong believe that just because the knee angle in a jump is 110 – 120 degrees, there is no need to squat deeper than 110 – 120 degrees. With this variation, you could potentially get the best of both worlds, the benefits of a full squat with a strong overload in the angles you are looking for.
If you want to know more about sport-specific training, please check out What is Sport Specific Training and what is Dynamic Correspondence.
As a quick note, there is also the option to attach the bands from the top, which I will be covering in a later article. The basic idea is the same the bands start position when you are strongest offers the least amount of support, hence resistance is highest, in the bottom position it offers the highest amount of support and resistance is lowest.
For more information, check out Bands For Size and Strength from T-Nation
How to use Chains
Similar to the bands, there are two basic options to adjust the chains.
- One or two straight chains, that are offering constant resistance
- One chain with a bunch of chains kicking in at a later stage of the movement, offering exponentially more resistance at a specific point
Ok, let’s look at the two options.
Constant resistance through chains
As you can see, the chain provides constant resistance as each segment of the chain touches the ground the further the athlete descends into the squat.
To be fair, the chains should be a bit longer, you can see in the top position they are off the ground. Thanks to our silver-medallist Jelle van Gorkom for the demonstration.
I use this variation to work on maximum strength development, as well as strength development and hypertrophy training.
Chain set-up that offers exponentially more resistance at a specific point
You can see in this example, that there is one chain hanging down from the bar and a bit further down are more chains attached, that kick in at around 90 – 100 degrees of knee angle.
It’s worth mentioning, that I have taken that video for demonstration purposes, in a real-life example, there would be more chains attached that kick in. The few chains in this video wouldn’t offer sufficient additional resistance.
This variation is most commonly used to address sticking points and the chains need to be adjusted to kick right at the sticking point of that individual.
To read up on the different training intensities and training methods, have a look at the articles
- 4 Thoughts on Accommodating Resistance from Elite FTS
- Chains & Bands Are the Secrets to Stronger Front Squats from The Bar Bend
- How much Strength Training is too much
- Insider Guide reveals How many Reps in the Back Squat you should do
- The Holy Grail of Strength Training – Sets and Reps
When not to use Accommodating Resistance Training
In my opinion, there are a few considerations, when not to use accommodating resistance, some obvious considerations, some not so obvious considerations, and some debatable considerations.
As we discussed, accommodating resistance can be used to accommodate resistance in an ascending strength curve. With that being said, there is not much of a point using accommodating resistance in strength training exercises with a descending strength curve or parabolic strength curve. Even though it might look quite cool.
There is not much of a point using accommodating resistance in strength training exercises with a descending strength curve or parabolic strength curve. Even though it might look quite cool.
I guess this point needs some further elaboration, for a strength training exercise with a descending strength curve or parabolic strength curve, there is no point using bands or chains which are useful tools for strength training exercises with an ascending strength curve. There are accommodating resistance machines, that are designed to accommodate the resistance for descending strength curves and parabolic strength curves.
With that being said, that also includes that accommodating resistance is not suitable for the Olympic Lifts and its derivatives.
In my opinion, accommodating resistance advanced training method and you need to have mastered the technique and be technically proficient, as well as having certain strength standards or strength levels.
Just have a look at the strength levels I have outlined in the articles
- The Fundamentals of the Back Squat for the Back Squat
- What Do Front Squats Develop and Why You Need To Do Them for the Front Squat
You should be in the category ‘good’ if you are considering adding accommodating resistance training or as Dan Baker puts it ‘Don’t give your best stuff away too early.’.
Concluding Accommodating Resistance Training – Bands and Chains
Accommodating Resistance Training is an advanced training method that can help you improve your strength and power levels.
Accommodating Resistance Training through the addition of chains and bands can be effective in increasing maximum strength and power levels, however, there are various ways to use the chains and bands and each variation leads to a slightly different result, therefore it’s important which option leads to which result to maximize your strength and power gains.